Table of Contents
- Create a Radius Object with an SDK Token and Radius Callback
- Create Transmitter Callback and Transmitter Object with a Tone Profile
- Register the Transmitter to the Radius Object
- Create "Hello World" Tone and Convert from ASCII String to Byte Array
- Create Button to Transmit "Hello World" Once
- Create Button to Transmit Repeatedly (Beacon) "Hello World" and Button to Stop
- Create Receiver Callback and Receiver Object with a Tone Profile
- Register the Receiver to the Radius Object
- Create Button to Grant Microphone Permissions and Start Receiving
Introduction
The following example demonstrates a basic application integrated with the LISNR Radius Android SDK. The application uses a Transmitter to either send once or repeatedly beacon the string "Hello World" to a listening Receiver upon pressing a button in the app.
The transmitting and receiving functionality should be performed on two separate devices although they are contained in the same application in this example for simplicity. Trying to transmit and receive on the same device using this application will not work. If you would like to see a bidirectional example see the Hello World - Bidirectional Two Transceivers examples.
In this example, you will learn to:
- Create a Radius Object with an SDK Token and Radius Callback
- Create Transmitter Callback and Transmitter Object with a Tone Profile
- Register the Transmitter to the Radius Object
- Create "Hello World" Tone and Convert from ASCII String to Byte Array
- Create Button to Transmit "Hello World" Once
- Create Button to Transmit Repeatedly (Beacon) "Hello World" and Button to Stop
- Create Receiver Callback and Receiver Object with a Tone Profile
- Register the Receiver to the Radius Object
- Create Button to Grant Microphone Permissions and Start Receiving
- Byte Array to ASCII
Estimated time to complete and run the example is between 5-15 minutes depending on level of Android development experience.
Audience
This example is meant for developers who are new to LISNR Radius and want to see a simple example of an application running the Radius SDK for Android. If you are not a developer, do not have access to the requirements, or want to observe all of the tone profiles, bidirectional, unidirectional, and major features of the Radius SDK, see the Radius Sample Application. If you have a Radius development question that is not addressed by these examples, please contact our Customer Success team (cs@lisnr.com).
Setup
Before writing any code using the Radius SDK, you will first need to set up your basic Android application and UI/UX. Follow these instructions:
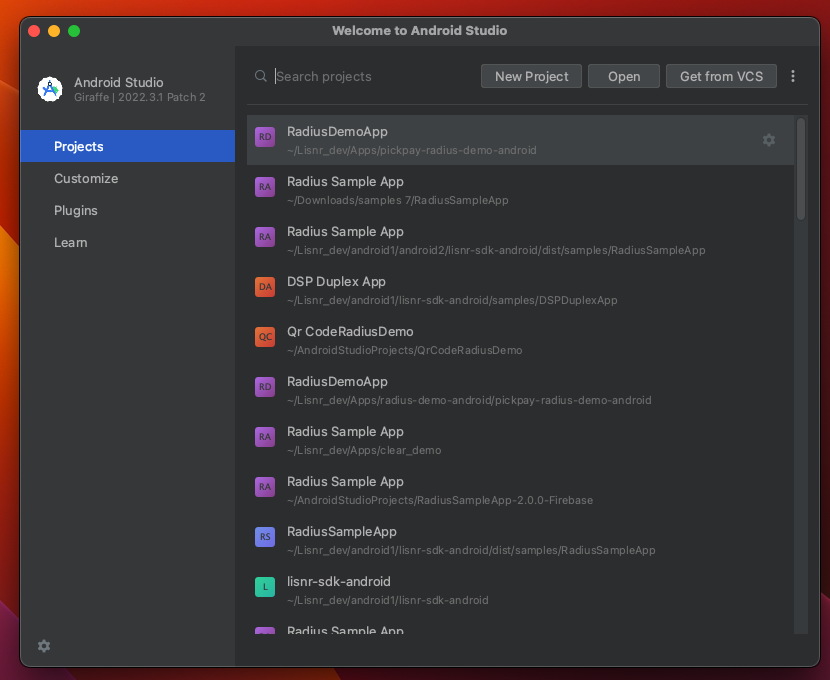
- Open Android Studio
- Select "New Project"
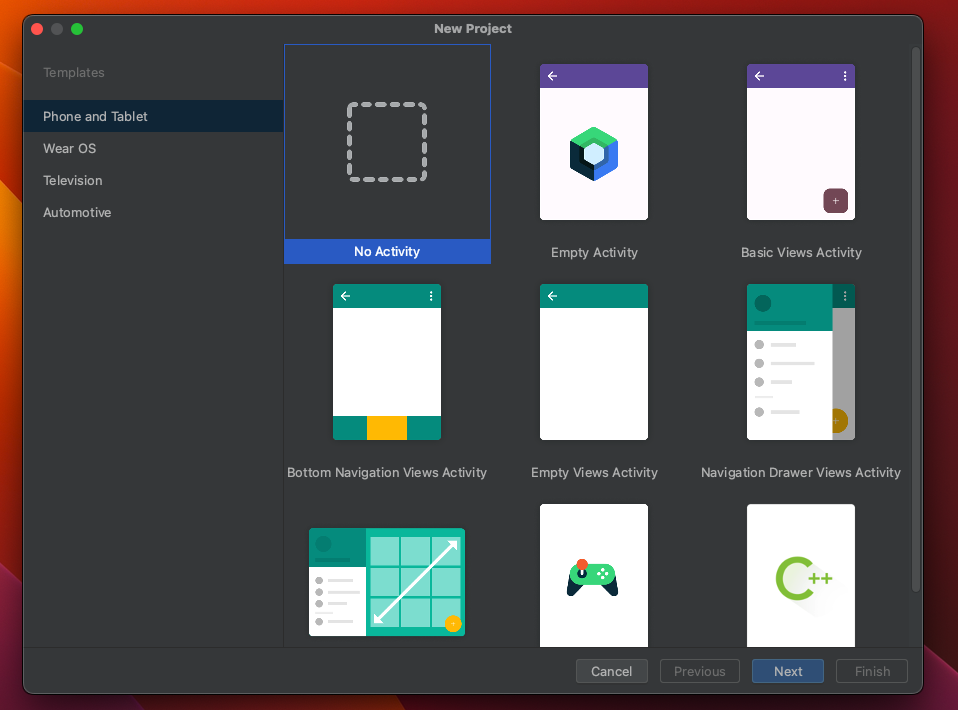
- Select "No Activity"
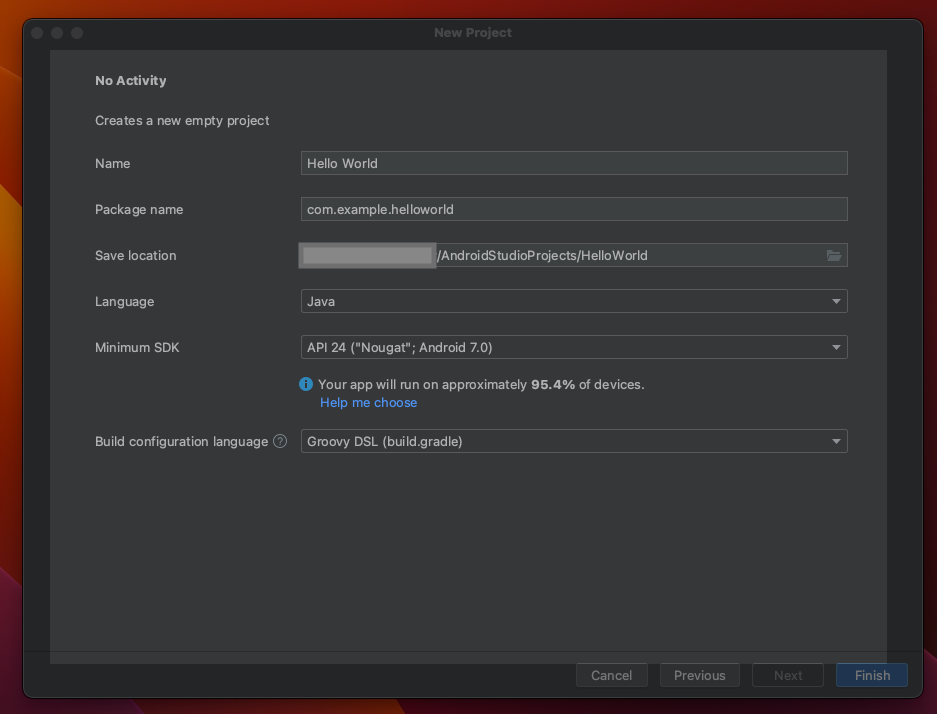
- Choose your Name (ex. Hello World), Package Name (ex. com.example.helloworld), and Save Location. Select "Java" as the Language and "Groovy DSL (build.gradle)" as the Build configuration language. The minimum supported Android version for the LISNR Radius Android SDK is 4.4 (KitKat), therefore choose your Minimum SDK version as any version 4.4 or higher.
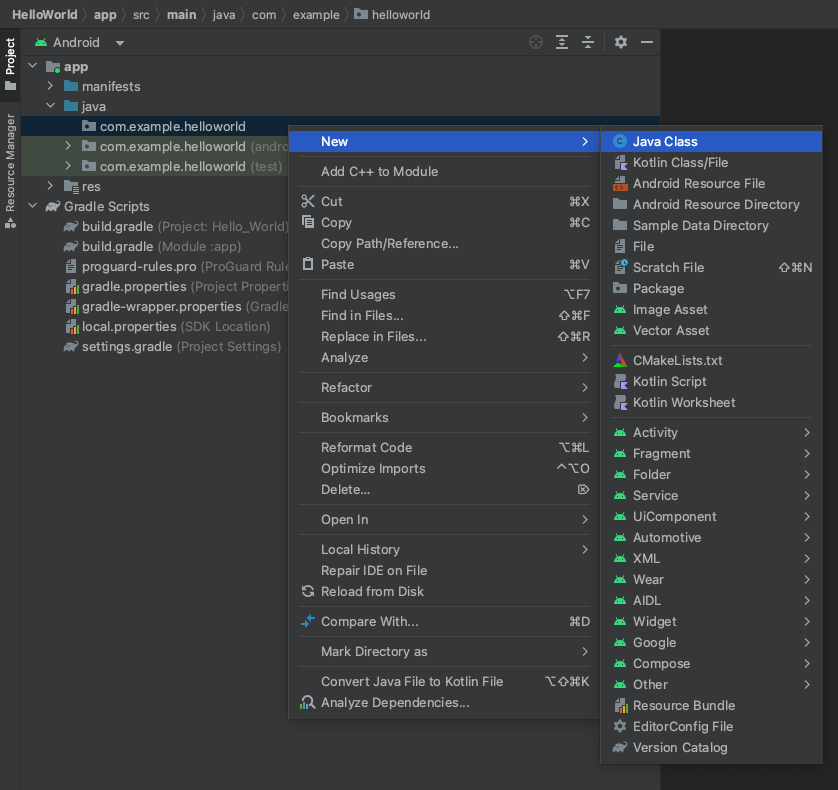
- Once the project has loaded, expand the "app" folder, expand the "java" folder, right click on the package name (ex. com.example.helloworld), and select "New" > "Java Class"
- Name the file (ex. HelloWorldActivity.java) and give it the following contents:
- Note: Replace the
SDK_TOKENwith an SDK Token from the LISNR Portal. The SDK token must be created with the same Android Application ID as this application (ex. com.example.helloworld). Your Android Application ID is located in the app level build.gradle file. - Note: Android Studio may indicate there are some errors within this file. These should be resolved when all steps are complete. package com.example.helloworld;import android.Manifest;import android.app.AlertDialog;import android.content.DialogInterface;import android.content.pm.PackageManager;import android.os.Bundle;import android.util.Log;import android.view.View;import android.widget.Button;import android.widget.TextView;import androidx.activity.result.ActivityResultLauncher;import androidx.activity.result.contract.ActivityResultContracts;import androidx.appcompat.app.AppCompatActivity;import androidx.core.app.ActivityCompat;import androidx.core.content.ContextCompat;import com.lisnr.radius.Radius; //import Radius classimport com.lisnr.radius.Receiver;import com.lisnr.radius.Tone; //import Tone classimport com.lisnr.radius.Transmitter; //import Transmitter classimport com.lisnr.radius.exceptions.AudioSystemException; //import exceptionsimport com.lisnr.radius.exceptions.AuthorizationDeniedException;import com.lisnr.radius.exceptions.BeaconNotPermittedException;import com.lisnr.radius.exceptions.InvalidArgumentException;import com.lisnr.radius.exceptions.InvalidProfileException;import com.lisnr.radius.exceptions.InvalidTokenException;import com.lisnr.radius.exceptions.InvalidTonePayloadException;import com.lisnr.radius.exceptions.RadiusDestroyedException;import com.lisnr.radius.exceptions.TransmitterNotRegisteredException;public class HelloWorldActivity extends AppCompatActivity {private TextView receivedPayloadContents;private Radius mRadius;private String mSdkToken = "SDK_TOKEN";private Radius.ErrorEventCallback mRadiusErrorCallback;private Transmitter.TransmitterCallback mTransmitterCallback;private Transmitter mTransmitter;private Tone mTone;private String mPayloadString = "HelloWorld";private Button mTransmitOnceBtn;private Button mStartTransmitRepeatBtn;private Button mStopTransmitRepeatBtn;private Receiver.ReceiverCallback mReceiverCallback;private Receiver mReceiver;private Button mStartReceivingBtn;private TextView mPermissionsDeniedTextView;private String receivedPayloadString = "";private ActivityResultLauncher<String> requestPermissionLauncher =registerForActivityResult(new ActivityResultContracts.RequestPermission(), isGranted -> {if (isGranted) {registerReceiverStartReceiving();} else {permissionDeniedUI();}});@Overrideprotected void onCreate(Bundle savedInstanceState) {super.onCreate(savedInstanceState);setContentView(R.layout.hello_world_activity);}@Overrideprotected void onResume() {super.onResume();mPermissionsDeniedTextView = findViewById(R.id.permissionsDeniedTextView);receivedPayloadContents = findViewById(R.id.receiverPayloadTextView);//Create a Radius Error CallbackmRadiusErrorCallback = new Radius.ErrorEventCallback() {@Overridepublic void onUnauthorizedCallback(String s) {Log.e("Radius onAuthorized - ", s);}@Overridepublic void onExceptionCallback(String s) {Log.e("Radius onException - ", s);}};//Create a Radius Objecttry {mRadius = new Radius(getLifecycle(), getApplicationContext(), mSdkToken, mRadiusErrorCallback);} catch (AudioSystemException | InvalidTokenException | AuthorizationDeniedException e) {Log.e("Radius Creation Error - ", e.getMessage());}//Create a Transmitter CallbackmTransmitterCallback = new Transmitter.TransmitterCallback() {@Overridepublic void onTransmitComplete(Transmitter transmitter, Tone tone) {Log.d("Radius onTransmitComplete - ", "tone has transmitted" );}@Overridepublic void onTransmitterEmpty(Transmitter transmitter) {Log.d("Radius onTransmitterEmpty - ", "finished beaconing" );}};//Create a Transmitter Objecttry {mTransmitter = new Transmitter(Radius.PROFILE_STANDARD2_WIDEBAND, mTransmitterCallback);} catch (InvalidProfileException e) {Log.e("Radius Transmitter Creation Error - ", e.getMessage());}//Register the Transmitter Object to the Radius Objecttry {mRadius.registerTransmitter(mTransmitter);} catch (InvalidArgumentException | RadiusDestroyedException e) {Log.e("Radius Transmitter Register Error - ", e.getMessage());}//Create "Hello World" Tone ObjectmTone = new Tone(mPayloadString.getBytes());mTransmitOnceBtn = findViewById(R.id.singleTransmitBtn);mTransmitOnceBtn.setOnClickListener(new View.OnClickListener() {@Overridepublic void onClick(View view) {//Transmit Tone Oncetry {mTransmitter.transmit(mTone);} catch (InvalidTonePayloadException | TransmitterNotRegisteredException e) {Log.e("Radius Transmitter transmit - ", e.getMessage());}}});mStartTransmitRepeatBtn = findViewById(R.id.startBeaconBtn);mStopTransmitRepeatBtn = findViewById(R.id.stopBeaconBtn);mStartTransmitRepeatBtn.setOnClickListener(new View.OnClickListener() {@Overridepublic void onClick(View view) {//Start transmitting repeatedly (beaconing)try {mTransmitter.beacon(mTone);} catch (InvalidTonePayloadException | TransmitterNotRegisteredException | BeaconNotPermittedException e) {Log.e("Radius Transmitter transmit - ", e.getMessage());}}});mStopTransmitRepeatBtn.setOnClickListener(new View.OnClickListener() {@Overridepublic void onClick(View view) {//Stop transmitting repeatedly (beaconing)try {mTransmitter.clear(); //you could also use mRadius.unregisterAll() to stop all transmitting and receiving} catch (TransmitterNotRegisteredException e) {Log.e("Radius Transmitter transmit - ", e.getMessage());}}});//Create a Receiver CallbackmReceiverCallback = new Receiver.ReceiverCallback() {@Overridepublic void onToneReceived(Receiver receiver, Tone tone) {Log.d("Radius onToneReceived - ", "tone has been received" );receivedPayloadString = payloadBytesToString(tone.getData());runOnUiThread(new Runnable() {@Overridepublic void run() {receivedPayloadContents.setText(receivedPayloadString);}});}};//Create a Receiver Objecttry {mReceiver = new Receiver(Radius.PROFILE_STANDARD2_WIDEBAND, mReceiverCallback);} catch (InvalidProfileException e) {Log.e("Radius Receiver Creation Error - ", e.getMessage());}mStartReceivingBtn = findViewById(R.id.startReceivingBtn);mStartReceivingBtn.setOnClickListener(new View.OnClickListener() {@Overridepublic void onClick(View view) {if (ContextCompat.checkSelfPermission(getApplicationContext(), android.Manifest.permission.RECORD_AUDIO) ==PackageManager.PERMISSION_GRANTED) {//Register the Receiver Object to the Radius ObjectregisterReceiverStartReceiving();} else if (shouldShowRequestPermissionRationale(android.Manifest.permission.RECORD_AUDIO)) {// In an educational UI, explain to the user why your app requires this// permission for a specific feature to behave as expected, and what// features are disabled if it's declined. In this UI, include a// "cancel" or "no thanks" button that lets the user continue// using your app without granting the permission.AlertDialog.Builder builder = new AlertDialog.Builder(HelloWorldActivity.this);builder.setTitle("Microphone Permissions").setMessage("In a moment the Hello World App will request permission to access your microphone. " +"Microphone access is used only to listen for high-frequency data tones. Your data is only processed locally on this device. At no time will audio be recorded. " +"If you do not grant the permissions, the receiving functionality of this app will be disabled.").setNegativeButton("CANCEL", new DialogInterface.OnClickListener() {@Overridepublic void onClick(DialogInterface dialogInterface, int i) {dialogInterface.dismiss();}}).setPositiveButton("OK", new DialogInterface.OnClickListener() {@Overridepublic void onClick(DialogInterface dialog, int which) {requestPermissionLauncher.launch(Manifest.permission.RECORD_AUDIO);}});builder.create().show();} else {// You can directly ask for the permission.// The registered ActivityResultCallback gets the result of this request.requestPermissionLauncher.launch(Manifest.permission.RECORD_AUDIO);}}});}private void permissionDeniedUI() {mPermissionsDeniedTextView.setVisibility(View.VISIBLE);}private void registerReceiverStartReceiving() {mPermissionsDeniedTextView.setVisibility(View.GONE);try {mRadius.registerReceiver(mReceiver);} catch (InvalidArgumentException | RadiusDestroyedException e) {Log.e("Radius Receiver Register Error - ", e.getMessage());}}private String payloadBytesToString(byte[] data) {StringBuilder dataString = new StringBuilder();for (int byteOffset = 0; byteOffset < data.length; byteOffset++) {byte dataNybbleLow = (byte) (data[byteOffset] & 0x0F);byte dataNybbleHigh = (byte) ((data[byteOffset] & 0xF0) >> 4);dataString.append(nybbleToChar(dataNybbleHigh));dataString.append(nybbleToChar(dataNybbleLow));// Spaces for readabilitydataString.append(" ");}final String[] strSplit = dataString.toString().split(" ");dataString = new StringBuilder();for (final String str : strSplit){final char chr = (char) Integer.parseInt(str, 16);if (chr < 0x20 || chr > 0x7E) {// Display non-printable ASCII as a unicode ?dataString.append('\uFFFD');} else {dataString.append(chr);}}return dataString.toString();}private char nybbleToChar(byte data) {char dataChar;if(data <= 9) {dataChar = (char)('0' + data);}else {dataChar = (char)('A' + data - 0x0A);}return dataChar;}}
- Note: Replace the
- Expand the "res" folder, expand the "layout" folder. If the "layout" folder does not exist, create a directory called "layout" inside of the "res" folder
- Right click on the "layout" folder and select "New" > "Layout Resource File"
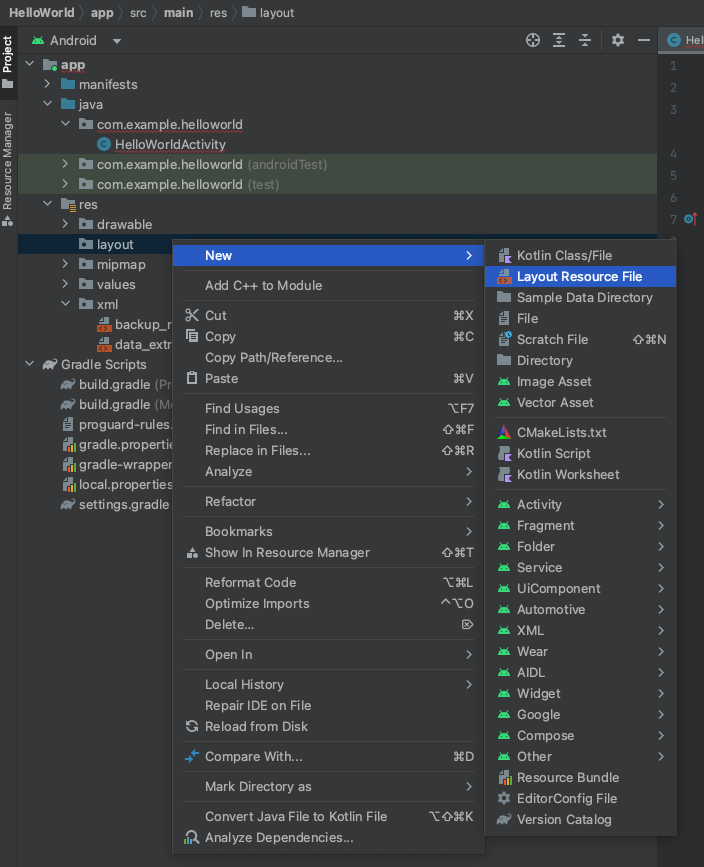
- Name the new file (ex. hello_world_activity.xml) and give it the following contents: <?xml version="1.0" encoding="utf-8"?><androidx.constraintlayout.widget.ConstraintLayout xmlns:android="http://schemas.android.com/apk/res/android"android:layout_width="match_parent"android:layout_height="match_parent"xmlns:app="http://schemas.android.com/apk/res-auto"><TextViewandroid:id="@+id/transmitterTextView"android:layout_width="wrap_content"android:layout_height="wrap_content"android:layout_marginTop="10dp"android:text="Transmitter"android:textSize="15sp"android:textStyle="bold"app:layout_constraintTop_toTopOf="parent"app:layout_constraintStart_toStartOf="parent"app:layout_constraintEnd_toEndOf="parent" /><Buttonandroid:id="@+id/singleTransmitBtn"android:layout_width="match_parent"android:layout_height="wrap_content"android:text="Transmit Once"android:textSize="15sp"android:layout_marginTop="15dp"app:layout_constraintTop_toBottomOf="@id/transmitterTextView"app:layout_constraintStart_toStartOf="parent"app:layout_constraintEnd_toEndOf="parent"/><Buttonandroid:id="@+id/startBeaconBtn"android:layout_width="wrap_content"android:layout_height="wrap_content"android:text="Start Transmit Repeatedly (Beacon)"android:maxLines="3"android:textSize="10sp"android:layout_marginTop="15dp"android:layout_marginEnd="2dp"app:layout_constraintTop_toBottomOf="@id/singleTransmitBtn"app:layout_constraintStart_toStartOf="parent"app:layout_constraintEnd_toStartOf="@id/stopBeaconBtn"app:layout_constraintHorizontal_chainStyle="packed"/><Buttonandroid:id="@+id/stopBeaconBtn"android:layout_width="wrap_content"android:layout_height="wrap_content"android:text="Stop Transmit Repeatedly (Beacon)"android:textSize="10sp"android:layout_marginTop="15dp"android:layout_marginStart="2dp"app:layout_constraintTop_toBottomOf="@id/singleTransmitBtn"app:layout_constraintEnd_toEndOf="parent"app:layout_constraintStart_toEndOf="@id/startBeaconBtn" /><TextViewandroid:id="@+id/receiverTextView"android:layout_width="wrap_content"android:layout_height="wrap_content"android:layout_marginTop="30dp"android:text="Receiver"android:textStyle="bold"android:textSize="15sp"app:layout_constraintTop_toBottomOf="@id/startBeaconBtn"app:layout_constraintStart_toStartOf="parent"app:layout_constraintEnd_toEndOf="parent" /><TextViewandroid:id="@+id/receiverPayloadLabel"android:layout_width="wrap_content"android:layout_height="wrap_content"android:layout_marginTop="10dp"android:textSize="15sp"android:text="Received Payload: "app:layout_constraintTop_toBottomOf="@id/receiverTextView"app:layout_constraintStart_toStartOf="parent"app:layout_constraintEnd_toStartOf="@id/receiverPayloadTextView"app:layout_constraintHorizontal_chainStyle="packed"/><TextViewandroid:id="@+id/receiverPayloadTextView"android:layout_width="wrap_content"android:layout_height="wrap_content"android:layout_marginTop="10dp"android:layout_marginStart="5dp"android:textSize="15sp"app:layout_constraintTop_toBottomOf="@id/receiverTextView"app:layout_constraintStart_toEndOf="@id/receiverPayloadLabel"app:layout_constraintEnd_toEndOf="parent" /><Buttonandroid:id="@+id/startReceivingBtn"android:layout_width="match_parent"android:layout_height="wrap_content"android:text="Start Receiving"android:textSize="15sp"android:layout_marginTop="15dp"app:layout_constraintTop_toBottomOf="@id/receiverPayloadTextView"app:layout_constraintStart_toStartOf="parent"app:layout_constraintEnd_toEndOf="parent"/><TextViewandroid:id="@+id/permissionsDeniedTextView"android:layout_width="wrap_content"android:layout_height="wrap_content"android:layout_marginTop="10dp"android:paddingHorizontal="10dp"android:textSize="15sp"android:visibility="gone"android:text="Permissions denied. Please enable them in app setting to use receiving functionality."app:layout_constraintTop_toBottomOf="@id/startReceivingBtn"app:layout_constraintStart_toStartOf="parent"app:layout_constraintEnd_toEndOf="parent" /></androidx.constraintlayout.widget.ConstraintLayout>
- Locate the manifest file (AndroidManifest.xml) and add the following line to it inside the <manifest> tag: and the following line inside of the <application> tag:<uses-permission android:name="android.permission.RECORD_AUDIO" />and the following snippet inside of the <application> tag as well. Make sure the android:name matches the corresponding name of the file in Step 6.:tools:replace="android:theme"<activity android:name=".HelloWorldActivity"android:screenOrientation="portrait"android:exported="true"><intent-filter><action android:name="android.intent.action.MAIN" /><category android:name="android.intent.category.LAUNCHER" /></intent-filter></activity>
- Add the Radius SDK - follow the steps in the Add Radius to Existing Application section to add the Radius SDK to your application.
- At this point, you now have the ability to run all of the functionality of this example.
The following sections show in detail the particular lines of code that are responsible for each aspect of the example application that you created in the setup steps.
Create a Radius Object with an SDK Token and Radius Callback
Before any transmitting or receiving functionality can happen, a Radius object must be created. A Radius object manages all instances of Transmitter and Receiver objects in your application. There should only be one Radius object in your application.
In the code snippet below, SDK_TOKEN will need to be replaced with a valid Radius SDK Token from the LISNR Portal. When creating your SDK token in the LISNR Portal, be sure to input the Android Application ID (found in app level build.gradle file) of the Hello World project (ex. com.example.helloworld).
Notice that the Radius constructor we utilize in this example takes a Lifecycle object in the constructor. (To learn more about the Android lifecycle, read the documentation: https://developer.android.com/guide/components/activities/activity-lifecycle) Passing in a lifecycle parameter when creating your Radius object will tie it's usability/lifecycle directly to the Android Lifecycle object. Therefore, whenever an ON_STOP event occurs in the provided lifecycle, the Radius object will be rendered unusable, shutdown, any transceiving/transmitting/receiving functionality will cease, and a new Radius object will need to be created when returning to the app. This can be useful if you want your application to automatically stop transmitting/receiving when a user backgrounds the app. To see an example of not using the lifecycle Radius constructor and manually shutting down the Radius object, see the Create a Radius Object and Shutdown Radius sections.
Create Transmitter Callback and Transmitter Object with a Tone Profile
In order to have transmitting functionality in the Hello World app, we will need to create a Transmitter with its required parameters. The Transmitter constructor requires a Transmitter Callback and a tone profile (see Tone Profiles to compare the other types). In this example, we will be using the Standard2_wideband tone profile, optimized for movement and longer distances.
The Transmitter callback determines what happens when a tone finishes playing (onTransmitComplete) and when a repeating beacon has stopped (onTransmitterEmpty). In this example, we are just adding logs in these callbacks but often times this is where a counter can be implemented to track how many times a beacon has transmitted or to update the UI/UX when broadcasting is complete.
Register the Transmitter to the Radius Object
Now that the Transmitter object has been created, it must be registered to the Radius object that was created earlier in order for the Transmitter to be authenticated and used.
Create "Hello World" Tone and Convert from ASCII String to Byte Array
The Tone object constructor requires a byte array. Use the getBytes() method to convert any String to a byte array.
Create Button to Transmit "Hello World" Once
Create Button to Transmit Repeatedly (Beacon) "Hello World" and Button to Stop
Create Receiver Callback and Receiver Object with a Tone Profile
In order to have receiving functionality in the Hello World app, we will need to create a Receiver with its required parameters. The Receiver constructor requires a Receiver Callback and a tone profile (see Tone Profiles to compare the other types). In order to detect the Tones from a Transmitter, the Receiver must be created with the same tone profile as the Transmitter.
The Receiver callback determines what happens when a tone is detected (onToneReceived). This is usually where the received tone payload is validated or processed by a backend and the UI/UX is updated to stop listening depending on the use case. In this example, we are adding a log in this callback and calling payloadBytesToString on the received Tone's data contents to convert it from byte array to ASCII string. See the Byte Array to ASCII section to see the payloadBytesToString method contents.
Register the Receiver to the Radius Object
You may notice there is no separate section in this example for how to start listening with a Receiver. When a Receiver is registered to the Radius object, listening begins. To stop listening for incoming Tones, the Receiver must be unregistered from the Radius object.
Create Button to Grant Microphone Permissions and Start Receiving
Microphone permissions are required in order to use a Receiver in the Radius SDK. This example shows how to perform the steps of checking for microphone permissions, providing context to the user, and then asking the user to grant permissions, before trying to listen/receive Tones with the Radius SDK. It is important that in a real Android application using Radius, to disable any UI/UX that is intended for receiving Tones if the user denies microphone permissions. In this example, the UI remains enabled when permissions are denied for simplicity sake. See Audio Permissions for more details on requesting runtime permissions.